Table of Content
Introduction
Goods - are nomenclature items (SKUs) that field employees work with.
Various information is collecting on SKUs using documents in the mobile application.
It is impossible to make an order, return, merchandising or shipment without filling out the SKUs directory.
Also, the functionality allows you to upload SKU images using the interface ST-Mobi.com.
List of SKUs
By default, SKUs directory looks like this:

SKUs Groups and Classifiers are using to navigate through the list of SKUs.
To view nested groups / classifiers, click on the arrow next to the name of the group / classifier.
The selected SKUs group or classifier is highlighted in gray and the report displays information on the product items of this group / classifier.
Attributes of the list of products
| Code | SKU code (often used as an article). |
| Short name | Short name of the SKU. |
| Full name | Full name of the SKU. |
| Unit | Basic unit of the SKU. |
| Barcode | Barcode of the SKU and Unit. |
| Sold by weight | Indication that the SKU is sold by weight (yes or no). |
| Weight | Weight of the SKU in it basic Unit. |
| Price | Price for the default price list selected in the settings. |
| SKU Group | The SKU Group that SKU belongs to. |
| Photo | Photos that were added to the SKU. |
| Participation in merchandising | Indication that the SKU participates in merchandising (yes or no). |
| Quantitative accounting of merchandising | Indication of how the SKU will be taken into merchandising:
|
Open in a window | Output of the SKU card in the modal window. If the data imported from ERP, the information in the card is not editable. |
Mark for deletion | Setting a mark about the inactivity of the SKU. |
| Additional attribute (one or more) | Additional information about the SKU:
|
If not all columns fit on the screen, horizontal scrolling of the screen appears to the right and left.
The display of columns, their width and relative position can be customized.
Also, it's possible of mass removal SKUs.
To do this, the SKUs that need to be marked for deletion are choosing in the list, and then delete button is pressed ![]() at the top of the directory page.
at the top of the directory page.
Additional features of the list of SKUs
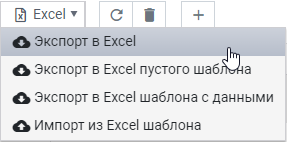
Export to Excel | Export directory data to an Excel file. |
|
|
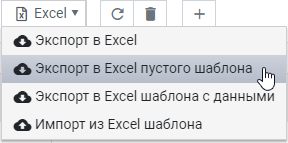
Export empty template to Excel | Export in Excel format an empty template containing all columns displayed in the table, intended for filling in and subsequent data import. |
|
|
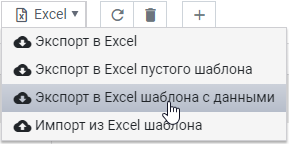
Export template with data to Excel | Export in Excel format of a template containing all columns displayed in the table and all the directory data visible at the time of exporting. Intended for information editing and subsequent import it back. |
|
|
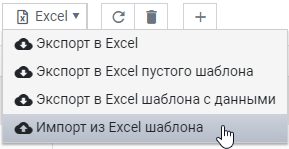
Import from an Excel template | Upload data from Excel template to the directory, exported before by using the Export Excel Template buttons (empty or with data). Important: template downloaded from the directory should be imported only in that direcotory! |
|
|
Search | Smart contextual search that searches for any column (except "Photo") depending on the values entered in the field. |
|
|


SKU Card
To view all the details of the SKU, click on the button ![]() in the list of SKUs.
in the list of SKUs.
The appearance of the SKU card looks like this:

SKU Image
ST-Mobi.com Web part provides an interface for uploading and editing SKU images directly through the user's web browser.
In order to use the functionality, you need to click  and in the window that appears, select the image of interest from the local PC disk.
You can upload several images of SKUs, and in that case field employees will be able to view all those images like an gallery in the SKU card in the mobile application.
One of the images can be made the main one by checking the box and clicking the appropriate button, such images will always be the first in the gallery.

Attention!
If it is necessary to automatically import images of goods from ERP, individual modification of the data exchange module may be required.
For more detailed information, please contact technical support.
Prices
Prices tab reflects the current prices for the selected SKU for all active price types.

Rests
Rests tab reflects the current rests for the selected SKU in all available warehouses.

Rests in Retail Outlets
Rest in Retails Outlets tab reflects the current situation with the rests of the selected SKU in Outlets, based on the collected merchandising documents.

Units
Units tab displays data about the units and the barcodes for the selected SKU.

Classifiers
Classifiers tab displays data about all available classifiers and it values for choosen SKU.

Additional attributes
Additional attributes tab displays data about created additional attributes and it values for choosen SKU.

Scopes
A tab that allows you to view which scopes the specific SKU being viewed is included in.
On this tab first will be displayed the selection of employees and outlets, after that the scopes that includes this SKU will be presented.

Managing SKU Groups
The SKUs directory has the ability to manage SKUs Groups - create new, edit existing, or delete unnecessary.
To go to the groups management section, use the button ![]() at the top of the directory page.
at the top of the directory page.
The section looks like this:

Creating new group
Using button ![]() you can create a new SKUs group.
you can create a new SKUs group.
Clicking on it opens a window in which you need to specify the code of the new group and its name, select the parent group, if necessary.
After that, it needs to save changes using the appropriate button.

Editing and deleting SKUs groups
To edit the SKU group manually, click the pencil button on the right side of the line ![]() .
.
After clicking, the SKU group card window opens (similar as creating a group), in which you can change the name or parent group.
To delete a SKU group, use the delete button ![]() to the right of the edit button.
to the right of the edit button.
There is also the possibility of mass deletion of several groups at once.
To do this, you need to tick the necessary groups to the left of their names, and then click the delete button ![]() at the top of the page.
at the top of the page.